
Where have we been?
We moved! To an off-grid farm, with no internet service. Not nearly enough time to write posts when we get to the library, but I figured I should say SOMETHING so people wouldn’t wonder. If I ever get time to write while at home, I will do so, and then I can copy/paste when I get the opportunity.
The Cultured Gathering

The Cultured Gathering
I recently came across The Cultures For Health Blog and subscribed to it. Cultured foods are so important to our health. Plus they are just so much fun to make! I’ve already posted about kombucha and sauerkraut here, but (if I don’t get distracted by life) I hope to share more of the good things I make. But even if I don’t, please go check out this blog! They have so much more than I could ever hope to share with you, and I’d hate for you to miss learning about all the great cultured/fermented foods that you could be making, too.
Relish!
At the end of our cob/cooking adventure, Caroline gave me a book entitled Relish: My Life in the Kitchen, by Lucy Knisley. I sat down about a month ago and read it clean through. Yup, I relished my day with Relish.

From the inside cover:
Lucy Knisley’s Mouth-watering graphic memoir will make you hungry.
Whether she’s injuring herself – again and again – in pursuit of a perfect croissant or bankrupting herself on fancy cheeses, Lucy Knisley knows what she wants: a good meal. The daughter of a chef and a gourmet, she comes by her priorities honestly. In this Technicolor love letter to cooking and eating, Knisley presents her personal history as seen through a kaleidoscope of delicious things.
Defying the idea of eating as a compulsion and food as a consumer product, Relish invites us to celebrate the meals we eat as a connection to our bodies, and to each other. Knisley’s intimate and utterly charming graphic memoir offers reflections on cooking, eating, and living – as well as some of her favorite recipes!
I didn’t read a lot of comic books growing up, and never a graphic novel that I can remember, so this was a fairly new thing for me. I liked it! The book is sitting on my desk, with my herbal and gardening books, awaiting another lazy afternoon for me to comb through the pages in search of a recipe to try.
Thank you so very much, Caroline, for this book!
~Jill
Cooking Day 10, Wednesday May 22
Breakfast
It was so nice to have this all ready in the refrigerator! And nobody complained about having it a second time.
Lunch
Repeat after me: “It was so nice to have this all ready in the refrigerator! And nobody complained about having it a second time.”
Dinner
- Eggplant Parmigiana
- Green Salad
Dinner tonight was all Caroline’s idea, and I played the role of assistant. Another fairly time-intensive job, but it was completely worth it! I think it was one of my favorite meals to eat, and I made sure I got some of the small amount of leftovers on Friday.
We finally remembered to use the mandolin slicer, which was definitely the right tool for getting perfect slices of eggplant. The dry bread crumbs were a combination of stale ends of loaves and crushed stuffing mix. We also added fresh basil leaves, which added a nice flavor. One of the workers wasn’t supposed to have dairy so we baked a pie pan full without cheese for him.
My husband and I make and drink kombucha. Tonight it was ready to bottle up. We decided to share it with everyone the following night with pizza (yes, again!) so instead of individual servings, it went into a gallon jar. Several people gathered around in the kitchen after dinner cleanup for a mini lesson on kombucha and how to make it, since we wanted to get a new batch started.

Kombucha
- 3 quarts filtered (non-chlorinated) water
- 1 cup white sugar
- 4 tea bags, preferably organic
- SCOBY and/or “starter” liquid (some from previous batch), 1 cup
We always use at least two tea bags of black or green tea, and then some sort of flavored tea for the other two. If you use just black and get it just right the end result tastes a lot like sparkling apple cider!
- Boil about a quart of water on stovetop.
- Add sugar, stirring to dissolve, about 5 minutes.
- Remove from heat, add tea, cover and steep, about 10 minutes (if you’re using green tea, remove after 5 minutes).
- Remove tea bags, put into gallon glass container.
- Add remaining 2 quarts water.
- Once tea is below 100, add your SCOBY and starter liquid.
- Cover with finely woven cloth, like a tea towel, or a coffee filter and secure with rubber band or string, to prevent dust and bugs getting in.
- Set aside, and taste after a few days once a new SCOBY starts to form with bubbles underneath.
Some important things to remember about making kombucha:
- Always use non-chlorinated water! If you can’t get spring water, then filtered or distilled is fine. If those aren’t available, then you can boil all the water ahead of time to evaporate the chlorine from your tap water.
- Always use glass containers, and never use metal utensils for the kombucha (though it is okay for the process of making the tea).
- Kombucha likes a dark, warm, non-drafty but well-ventilated place to ferment. Preferably not in the kitchen, but if that’s the only place you have, keep it away from the stove.
- The longer your ‘bucha ferments, the more healthy it will be, but it will get more like vinegar the longer it goes. Once it starts to bubble and a new SCOBY is formed on top, taste it (use a small glass jar or plastic spoon to dip out a taste) to see if it’s to your liking. Remember it started out as sweet tea, so if its still noticeably sweet it should probably go a bit longer. Eventually you’ll be able to rely on the smell as a clue to it’s state of readiness. We prefer it still a bit sweet, just starting to turn sour, but I know some families love it the stronger it gets.
- Once it’s ready to bottle, be sure to set aside a cup of liquid along with the SCOBY to use for your next batch. A glass pie plate or jar works well for this step.
- We like to do a second ferment. We will add some fruit (or other food) to the bottle along with the kombucha, and let it sit out for another 2-7 days, but usually about 3. We have a collection of bottles that originally held GT Dave’s kombucha, and we simply rinse well with hot water after a bottle is emptied, and then turn upside down to air dry.
There are many variations of the basic recipe, and it’s really hard to get wrong. This one uses more tea bags and shares a method for a second ferment process, this one brews for longer, and this one has a great list of the “Golden Rules” for kombucha as well as more recipes.
Happy brewing and good health to you!
~Jill
Two Little Piggies
We were informed YESTERDAY that we have 2 new piglets arriving today. While that is really cool and nifty, we happen to have been in the process of tearing down the fencing where the piglets would live! Ok. So now we have an emergency fence restoration project. And no gate.
We managed to get the fence straightened out and put back in place. The intent was to rip it out and put in a new fence line that made more sense and gave more space inside and had new fence material instead of the crippled, bent, and mangled mess that was there. But 3/4 of the fence had chickenwire attached and thoroughly and completely entangled in the grass. It would have taken days of intense effort to rip it out. So I decided to leave most of it in place, patch it where necessary, put in a couple new posts, and call it good.
Then came the gate. I am not a carpenter. I do not have much experience designing and planning out a project using wood. After a couple internet searches, and hours of staring blankly at a wall thinking about it, I finally settled on a design and ventured out in search of suitable wood. We found a very large pile of 2×6 lumber in the woods. But it was 90% rotted out. Fortunately, I only needed 5 boards, and managed to find what I was looking for after a little digging. Then I had to find a saw and a flat place to work. Up to the top of the hill where there is a house being built, and I managed to find floor space that was mostly level. The floor is dirt throughout right now. And not very level or flat. And of course, there’s no power up there except for the solar system, but fortunately the battery was charged and the old inverter was still working.

Inverter and batteries
Anyway, after a hundred hurdles, I finally got the pieces cut and brought back down to my yard to assemble. Gopher hills, holes, and lumps aside, it was mostly an easy job to assemble the gate. Except I have no cordless drill, and the power drill has only one speed. It is not fun to drive screws with a single-speed drill!

Pig pen gate assembled
You’ll notice there is a diagonal piece. That required an angle cut. There happens to be a miter saw up in the building where I cut the pieces. But it’s a small one, so it only cuts through a 2×4. Which means I had to cut the angle board half-way through, flip the board, try to match up the angle, and then finish the cut.
Off to the install. But wait! I have no cordless drill, and the pig pen is far from the house! Does this project EVER get past “the hard part”?? A very long extension cord was finally found. Of course, the fence posts are rough logs, so lining up the hinges proved a bit of a challenge. Did I mention, I’m not a carpenter? A bow saw, a chisel, and some “customizing”, and it finally started to cooperate with me. After digging up about 6″ of dirt and sod on the inside to make space for the gate to open, it is now hung and swings very nicely. I settled for the hook-and-eye latch since that’s all I had on hand.

New pig pen gate hanging on hinges!
Oh, and there is a 1/4″ steel mesh stapled to the inside. That will keep the chickens in too, when I open their area up and let them run with the pigs. And the screen mesh looks good, and is “pig proof” too.

Piggies in their new home

They will have to mow their own lawn
Now to solve the food and water dish issue…
— Jack
Cooking Day 9 – Tuesday May 21, 2013
Breakfast
- cold cereal
- yogurt
- eggs
Breakfast getting less inspired? Perhaps, but people seemed happy to have something different, and to dig through and finish off several boxes of assorted flavors of cereal.
Lunch
- More leftovers!
Today it was pizza, potato soup, turkey salad sandwiches, and fruit salad.
Dinner
- Beef Roast with gravy
- Carrots
- Green Salad
- Baked Potatoes
- Dinner rolls
Curtis, one of the guys at the workshop who was gone over the weekend, brought back a bunch of great food from the local discount grocers (I love those places!) AND a grass-fed beef roast from the farm’s kitchen where he works! This was the first beef we had because I was asked to use only poultry or fish, no red meat, as the smell of it cooking was objectionable. Well, I wasn’t about to turn down a gift like this!
I coated the roast with various herbs, and browned it in a skillet first thing in the morning, and then put it in the crock pot along with onions, garlic, and carrots. I made sure to have the windows open to air out the kitchen, and the cooking smells were contained the rest of the day inside the crock. It also happened to be the day that Kim was outside and then gone most of the day and wasn’t home to eat with us.
I decided to make gravy, to go for the extra love and appreciation. Not necessary, because everyone was always appreciative of our cooking. We had two vegetarians for dinner, but they had plenty of goodies and didn’t mind that we were eating beef.
~Jill
Cooking Day 8 – Monday May 20, 2013
Breakfast
- Pancakes
We used some fancy flavored mixes that were in the cupboard. Served with butter, peanut butter, maple syrup.
Today didn’t require much kitchen work, so I went outside to participate in the cob building fun. I decided to help work on the remaining section of the rock wall. Steff showed me how to do it.

While moving one rather large rock out of my way it decided to roll back down the bank and crushed my finger against another rather large rock. Major ouch! After continually banging my finger against anything and everything in the kitchen the rest of this day, I spent the rest of the week bandaging it quite well.

It’s a little over a month later, it has grown out, and now it’s just wait-and-see if/when it’s going to fall off.

Lunch
- Leftovers!
Today we pulled out a pan of enchiladas, chili, soup and stew, and potato salad.
Dinner
- Beans & Rice with toppings (pretty much like our taco/burrito night, except with rice instead of tortillas)
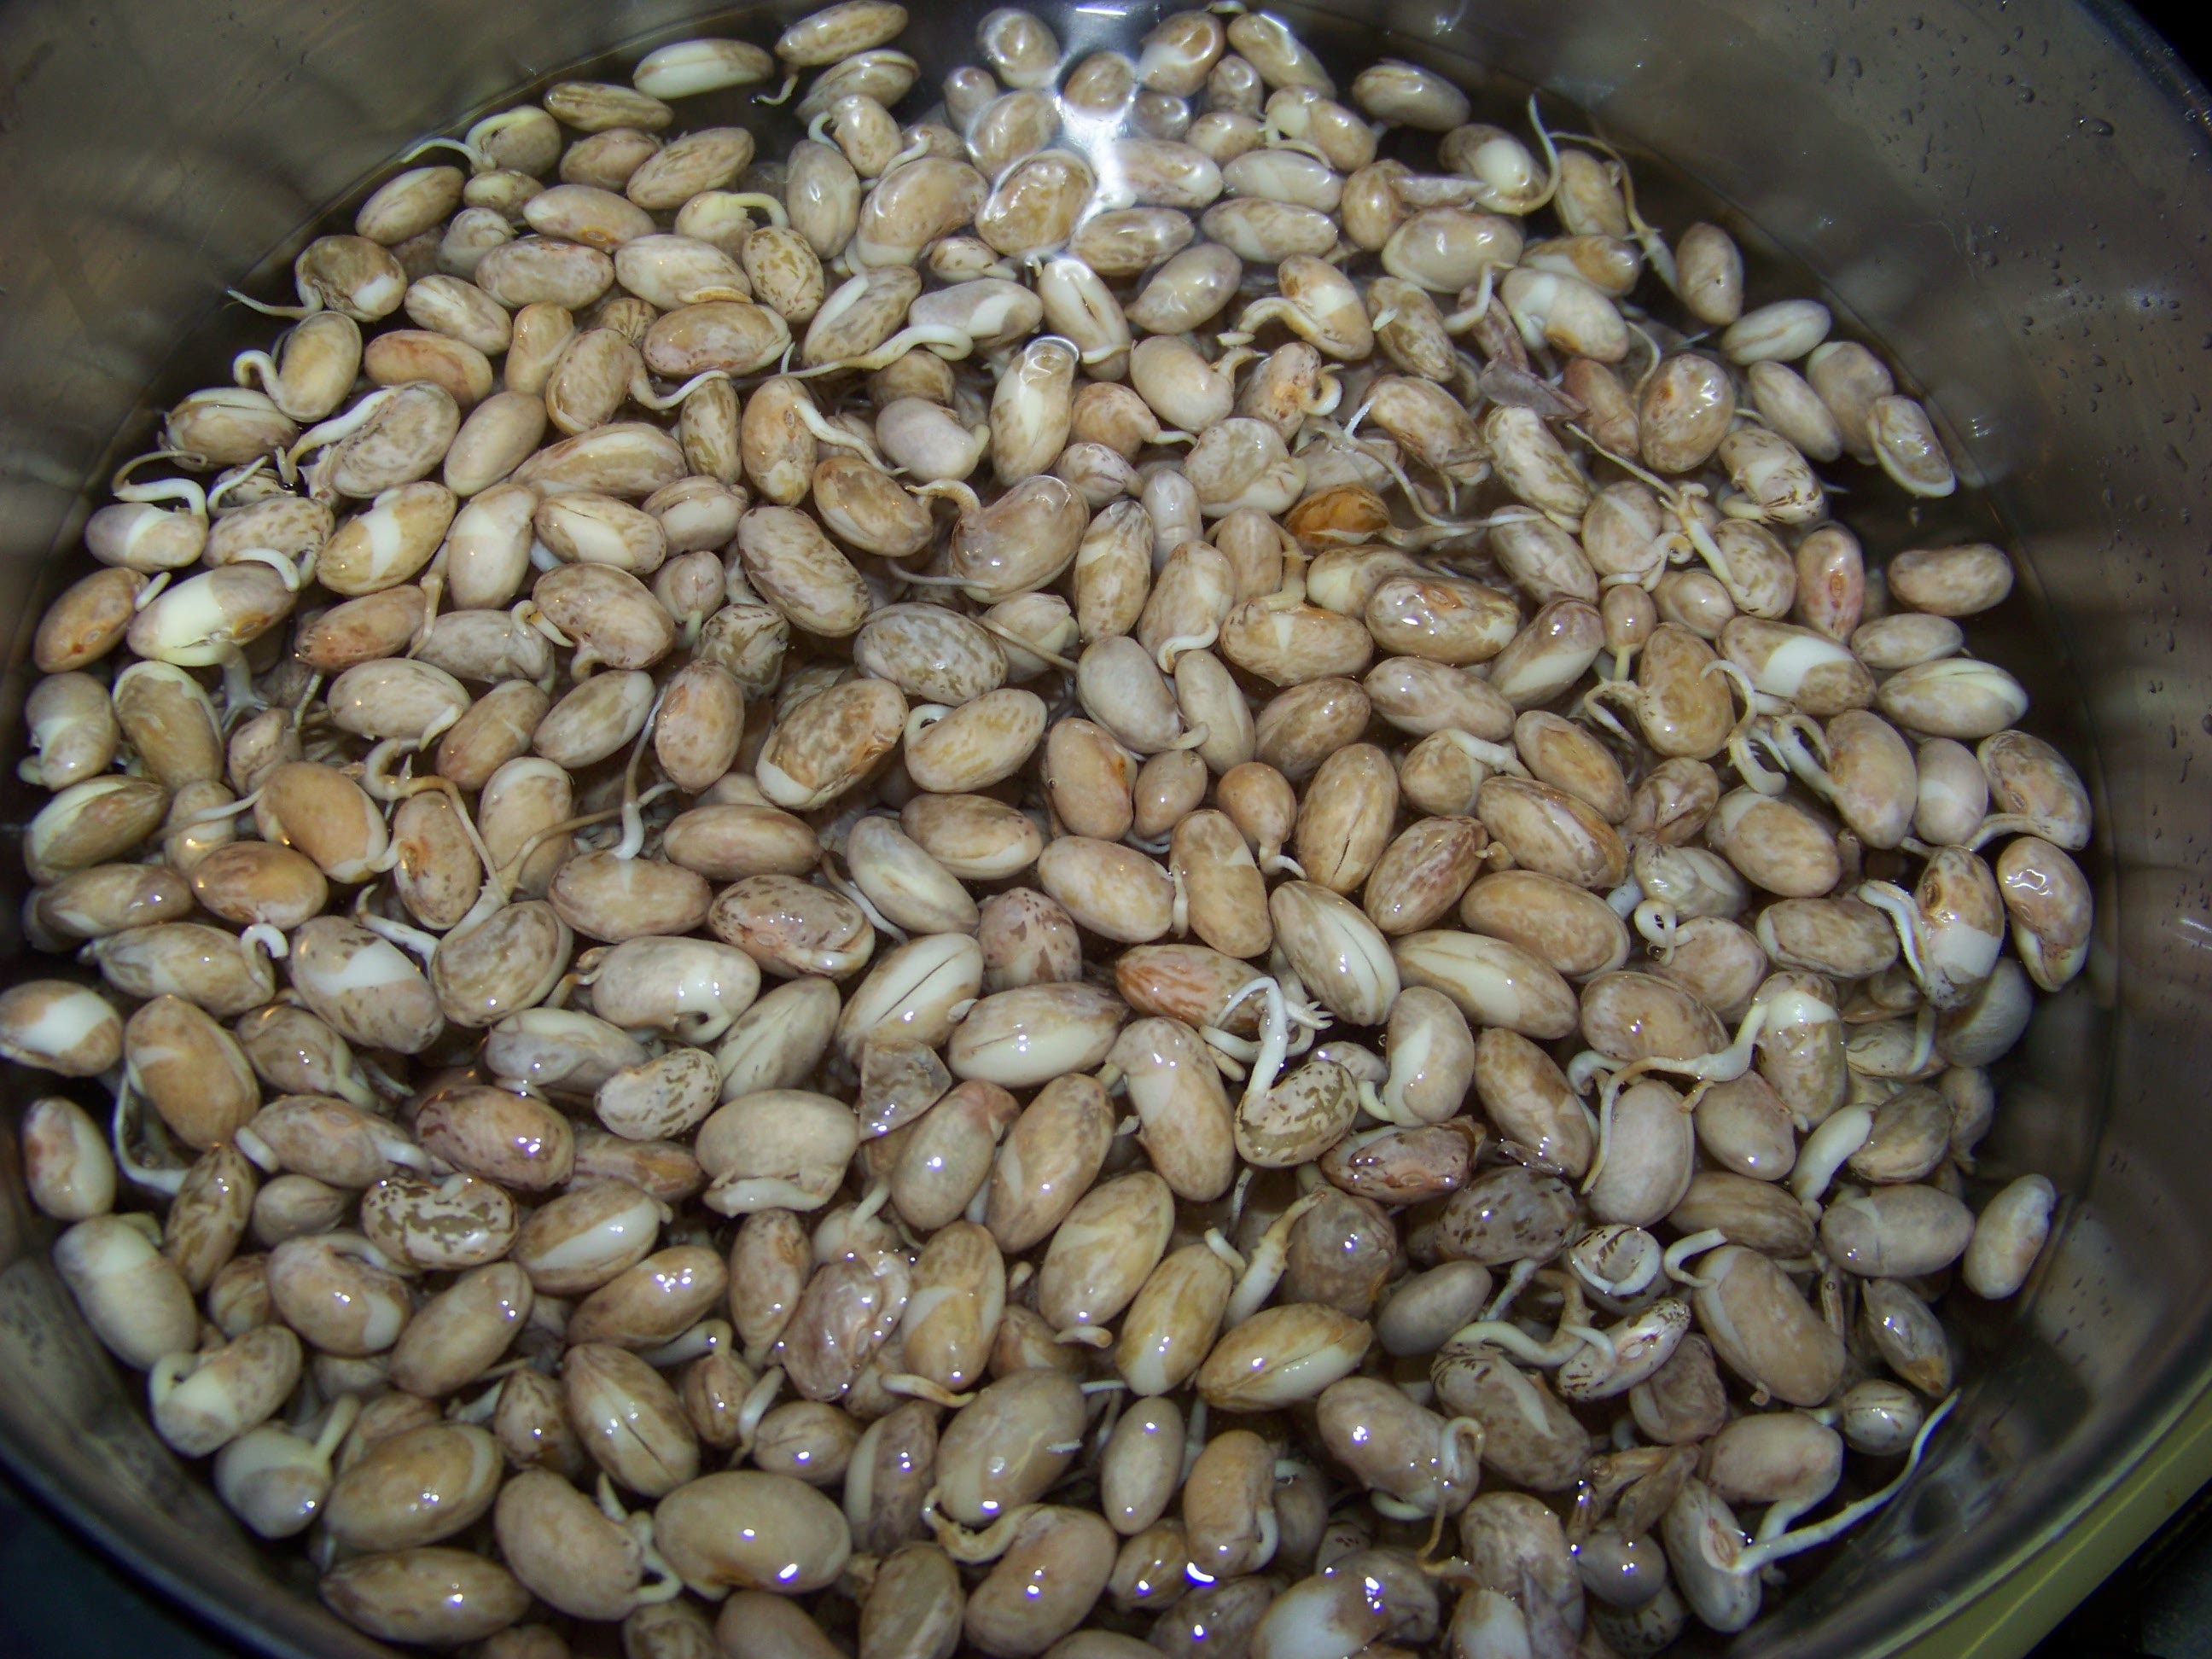
I cooked some more beans that I had soaked and sprouted. They are just so cute with their little “tails” on them!
Caroline made Mexican-style rice. http://mexican.food.com/recipe/mexican-rice-117892
~Jill
Cooking Day 7 – Sunday May 19, 2013
Breakfast
Have I mentioned how much I like the Pioneer Woman? Oh yeah, I’m sure I have, a couple times. This is a recipe I’ve never made before, but one that I knew would be fabulous. Several people found the kale in the fridge ahead of time and were excited to have it. I think they were even more excited to have it cooked in this way. We prepared two of these the night before, to serve two different mornings.
- 12 eggs
- 2 ½ cups half-and-half or milk
- S&P
- 4 Tablespoons minced fresh oregano (or basil, or whatever you feel like using. You don’t have fresh? Use some dried, but fresh is best.)
- 1 loaf crusty Italian or French bread, cut into cubes
- 2 pounds breakfast sausage, cooked, cut into cubes
- 1 large bunch kale, torn into pieces
- olive oil
- 1 pound mushrooms, halved (or sliced or quartered if they are large)
- 2 ½ cups grated Monterey Jack cheese
Mix eggs, milk, and spices. Set aside.
- Heat oil in skillet, medium-high heat. Throw in kale. Cook 2 minutes, until slightly wilted.
- Drizzle olive oil and S&P over mushrooms on a cookie sheet. Roast at 425 for 15-20 minutes, until golden brown.
- Butter 9”x13” casserole dish.
- Layer half of the bread, kale, mushrooms, sausage, and cheese. Repeat.
- Slowly pour egg mixture over top.
- Cover and refrigerate.
- Remove from refrigerator 20-30 minutes before baking. Cover with foil.
- Bake at 350 for 30-40 minutes.
- Remove foil, and continue baking until crispy golden.
Lunch
- Chicken (Turkey) Noodle Soup
I didn’t follow a recipe for this soup. I started with my homemade broth and just started adding stuff, like the leftover pot pie filing. I would have loved to make homemade eggs noodles like Granny used to make, but I used packaged instead. I just didn’t have time to get too involved, because dinner was the focus of the day, and it took a lot of time and help.
Dinner
The crust got started early in the day. I think we did 4 batches, because extra is always good. Ideally, for pizza, you would use just unbleached all-purpose flour, but I didn’t have enough, so it was a blend again. It still tasted yummy, just not as yummy as it could have been, IMO. (And we all know that MY opinion is important.)
- 6 ½ cups flour
- 3 cups warm water
- 1 ½ Tablespoons (or 2 packages) yeast
- 1 ½ Tablespoons kosher or coarse salt.
- Stir all ingredients together in large bowl or glass container (5 quart size is about right). The dough will be wet and “shaggy”.
- Cover and let rise on counter top 2+ hours. It should triple in size.
- Chill dough in refrigerator for 3+ hours for best flavor and ease of handling. (We didn’t have time or space to chill the dough, and it still turned out fine. But if you can do it, so much the better! Stays good in refrigerator for a week.)
At this point you could simply make artisan style bread, but we are making pizza! Pizza really does turn out best if you have a pizza (baking) stone, but cookie sheets work, too. I also highly recommend using parchment paper. If you’ve never used it before, do it now! I can’t believe I tried making bread and pizza for so long without it. It makes a world of difference! If you have a pizza stone in the oven, simply use a pizza peel or large cutting board or the back side of a cookie sheet to transfer your pizza into and out of the oven.
- Take half (or a third) of the dough. Smash it into a circle on parchment paper. If you get a hole in it, just smoosh it some more to fix it. It’s all good. It will rise when baking, so get it as thin as possible, unless you like thick crust. Leave a slightly raised edge.
- Place crust and parchment paper on pizza stone that has been preheated in the oven. Bake for 10 minutes at 450.
- Take out of oven and put your favorite toppings on the crust. I suggest cheese first after the sauce to help hold the other toppings to the crust.
- Bake an additional 10 minutes.
- Serve to your ever-more-adoring fans.
We made 8 different dinner pizzas, including some vegetarian options as well as a small one with minimal cheese, an attempt at baked potato pizza, and 2 dessert pizzas, using canned pie filling over a cream cheese base. This was an extremely time- and labor-intensive meal, but we enjoyed making it and everyone enjoyed eating it. And, of course, we had WAY too much for one meal!


~Lynn
Cooking Day 6 – Saturday May 18, 2013
Breakfast
- Scrambled eggs
- fruit bowl
Lunch
- Chicken Chili
- Green salad
- Bread (I have this written down, but don’t remember making or serving any with this meal)
This is another recipe that I got from an online friend. I doubled the recipe, and we didn’t have much leftover. I did set aside some without chicken for our vegetarian. I cooked the beans first thing after breakfast. They cook much faster after soaking and sprouting. Why soak your beans?
Soaking beans for many hours before cooking them produces a lot of scum which is course, is rinsed and drained away when the soaking is complete.
What is all that scum anyway? Anti-nutrients, that’s what! And those anti-nutrients such as phytic acid and enzyme inhibitors are going to be in your gut causing you gas, heartburn, reflux and whatever other digestive ills beset you when you eat something that isn’t particularly digestible unless you soak your beans before cooking them.”
Why sprout your beans? It makes the beans more nutritious, and aids in digestibility. (Read the links, people.)

Anytime you cook beans you should skim off the floating beans, skins, and the foam.


Chicken Chili
- 1 pound Navy beans (allow 12 hours for soaking, and 12+ for sprouting)
- 1 quart chunky tomatoes
- 2 cups chicken broth
- 2+ cups cooked, diced chicken
- 3 cups corn
- 1 Tablespoon apple cider vinegar
- 2 teaspoons chili powder
- 2-3 teaspoons salt
- 1 teaspoon coriander
- 1 teaspoon onion powder
- ½ teaspoon cilantro
- ½ teaspoon basil
- ¼ teaspoon oregano
- ¼ teaspoon pepper
- ¼ teaspoon cayenne
- Cook beans until tender, use no salt or other seasonings. Drain.
- Combine all ingredients in large saucepan.
- Simmer at least one hour.
We ran out of chili powder, but I mixed some up. There are several variations online, but this is the one that I used.
Chili Powder
- 1 Tablespoon cumin
- 2 teaspoons garlic powder
- 1 teaspoon cayenne
- 1 teaspoon paprika
- 1 teaspoon ground oregano
Dinner
- Baked Ziti
- Green Salad
- French Bread
We made three pans of baked ziti, and added cooked ground turkey to two of the pans.
Baked Ziti
6-8 servings
- 16 ounces ziti pasta (or whatever shape you want)
- 24 ounces ricotta cheese (cottage cheese makes a fine, less-expensive substitute)
- 1 pound shredded mozzarella cheese
- 1 egg, beaten
- 32 ounces spaghetti sauce
- ¼ cup Parmesan cheese
- Boil paste 8-10 minutes, until al dente. Drain and rinse.
- Mix ricotta, mozarella, and egg with 1 ½ cups of sauce. Add ziti.
- Preheat oven to 375.
- Grease a 9”x13” baking pan.
- Spoon mixture into pan. Top with remaining sauce and parmesan.
- Bake 30 minutes, or until cheese is melted and bubbly.
French bread is always so yummy, and is very easy to make. Served hot with butter is a given. Or do as we did, and make some salty garlic butter to spread on the loaves (sliced in half lengthwise), and then wrap in foil and bake until all that garlicky buttery goodness is soaked into the bread. Even if the rest of your dinner doesn’t turn out well, everyone will love you for the bread alone. I wish I had a photo of the bread, it was so beautiful!
French Bread
- 2 Tablespoons sugar
- 2 Tablespoons oil
- 2 teaspoons salt
- 2 cups hot tap water
- 4 ½ – 5 cups flour (can be half whole wheat; may need a teaspoon of gluten)
- 2 Tablespoons instant yeast
- 1 egg
- 2 Tablespoons milk
- Put sugar, oil, salt, and hot water in a large bowl. (Can also use a mixer with bread hook.)
- Add 1 cup of flour mixed with yeast, then rest of flour, ½ cup at a time, stirring after each addition. Add until dough comes away from side of bowl or easily holds a ball shape and isn’t too sticky if you handle it with floured hands.
- Cover bowl with waxed paper and a tea towel.
- Let rise until double, about ½ hour.
- Divide in half. Roll out on slightly floured surface to about 12”x15”. Roll up jelly roll style, beginning at longer end. Place on greased or parchment paper-lined cookie sheet. Only one loaf per sheet! (Ask me how I learned this…) Cut diagonal slits. Cover.
- Let rise 30-45 minutes. Brush with egg-milk mixture.
- Bake at 400 for 20 minutes, or until golden brown.
And thus ends the first half of cooking for the cob workshop.
~Lynn
Cooking Day 5 – Friday May 17, 2013
Breakfast
- Oatmeal
I finally got the oats made that I had planned to make for several mornings. This ended up being the only day we actually had THESE oats, which was fine. I used two crock pots, and we had a lot of leftovers, but that was intentional so that we could have leftover oatmeal cake. We had enough leftovers for 4 cakes! One of the nice things about making your oats in the crock pot is that people can just help themselves whenever they’re up and hungry, instead of waiting for you. You know, in case you want to sleep in.
Crock Pot Oatmeal
- 2 cups regular rolled oats (you can use quick oats, but they won’t keep their shape and you will end up with mush. Still edible, just not as pretty.)
- 2 cups chopped apples (or you could use a can of apple pie filling and less sugar)
- 1 cup raisins (or less)
- 4 cups milk (or how I usually do it: 2 cups each water and milk)
- 1 teaspoon cinnamon
- ½ teaspoon sea salt
- 2 Tablespoons butter
- ½ cup brown sugar (allegedly optional, but IMO it’s not, especially if you’re using fresh fruit)
- Stir all ingredients together in crock; cover.
- Cook overnight or for 6 hours on low or warm.
You may have to get to know your own particular crock pot to know what works best. I was working with unknown tools, so I got up 6 hours before breakfast to turn them on. Overcooked oats aren’t that great, and you lose a lot that gets stuck to the pot.
I have made these with canned peaches, canned pears (not recommended – they get really mushy), no raisins, and other dried fruit like bananas or apples. Once I even used cooked squash and pumpkin pie seasoning rather than just cinnamon! Use your imagination and what you have on hand.
Coconut oil is a good substitute for the butter.
Another interesting addition that gives this a bit more body and protein is a couple of eggs, raw and scrambled, stirred in with everything else at the beginning.
Lunch
- Leftovers!
We heated up one of the pans of enchiladas and some potato salad. Possibly some other things, too, but I know the potato soup and lentils got saved for another day.
Dinner
- Green Salad
- Taco/Burrito bar
- tortillas
- cooked pinto beans
- ground turkey with Mexican-y spices
- salsa
- rice
- lettuce
- olives
- cheese
These meals where everyone got to dish up their favorite toppings worked well for a crowd.
I made more tortillas, starting after breakfast since I didn’t have any lunch preparations, tripling the recipe so we would have two apiece. I took a few pictures this time of the process. The first shows all the little balls of dough after resting, with the first one I rolled.

I took each ball and flattened it with my hands into a circle about 4” in diameter.

Then, on a well-floured surface, I rolled them as thinly as possible. When rolling, you start from the center and work your way out. Keep your stack of raw tortillas covered with a damp cloth as you roll each one. You should keep the balls of dough covered as well, so they don’t dry out.

Once I’m ready to start cooking them, I heated up a cast iron skillet on medium. I think another type of skillet would need a higher temperature, but I’ve always used cast iron. No oil in the pan at this point. It only takes 20-30 seconds per side, turning when it starts to form bubbles. Store in an airtight container until ready to use.

I suggest reheating any tortilla before eating, as leaving them cold makes them easier to fall apart, in my experience. My preferred method is to have oil in the pan so they end up hot and a little bit greasy – yum!
~Lynn

Recent Comments